- Camtasia
- Canvas
- Course Information Matrix
- Lecture Capture
- ORCID
- Qualtrics
- Student Tracking and Advising
- Zoom
What are STARS campaigns and watchlists? How do I use them?
Campaigns are targeted messages that select users with STARS Advisor or Manager access can send to groups of students within the STARS application to remind them to take action related to their academics, including scheduling advising appointments, registering for classes, and applying for graduation. These messages appear to students upon login to STARS and provide actionable items for them to be successful.
- Campaigns are available to STARS users with Advisor or Manager roles.
- There are three types of campaigns 1) Appointment campaigns, 2) class registration and 3) graduation application.
- Watchlists are targeted groups of students that can be generated using the Advanced Search tool in STARS; based on different criteria, like credit hours, registration status, and more. Before setting up the campaign itself, advisors need to first identify the eligible students to add to the campaign.
Appointment campaigns
Advisors can create and send a campaign to all their assigned students to encourage them to schedule an advising appointment. Follow the steps below to create an Appointment Campaign.
- Access STARS
- Navigate to stars.wayne.edu.
- Click on the Staff Login button and log in with your AccessID and password.
- Creating campaigns
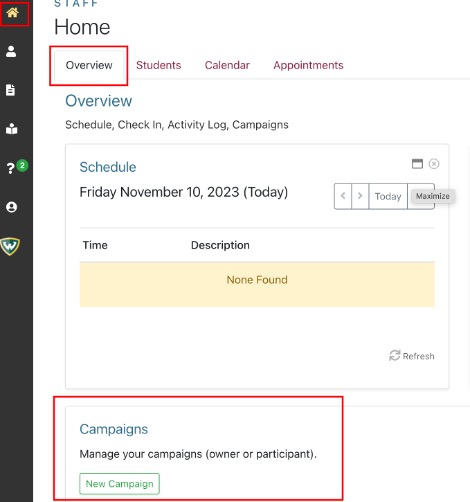
- The campaign feature is in the Home section, under the Overview tab.
- Click on the New Campaign button to start the campaign creation process.
- Note:The campaign creation process includes four crucial steps. You must finish each step before proceeding to the next.
- Note:The campaign creation process includes four crucial steps. You must finish each step before proceeding to the next.
- The campaign feature is in the Home section, under the Overview tab.
- General tab
- Provide a name for the campaign that reflects its theme.
- Under Type, select Schedule an appointment from the drop-down menu.
- Specify the maximum number of appointments allowed for the campaign.
- Choose the date range for the campaign.
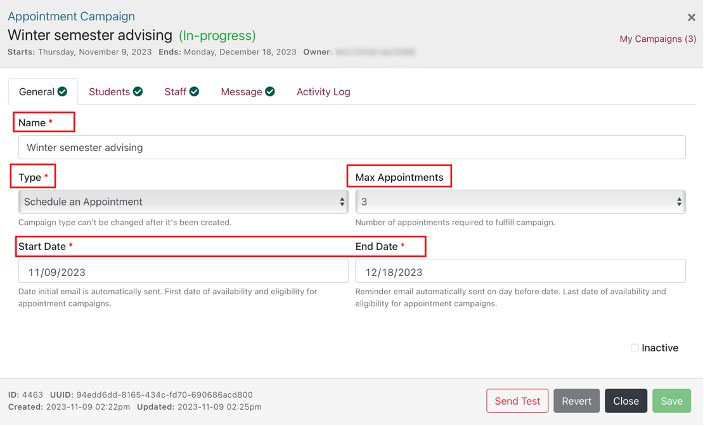
Note:Campaignsscheduled for future dates will be designated as pending, those with past dates as expired, and those with today's date will set your campaign to in-progress.
- Student tab
- Add students to your campaign using various options:
- Select List to use a pre-existing watch list.
- Select Search to search for students by AccessID or first/last name.
- Select Upload to upload a file or add students manually.
- Review the populated list and use the Action menu to add or remove students if necessary.
- Click Select all before proceeding to the next tab.

- Add students to your campaign using various options:
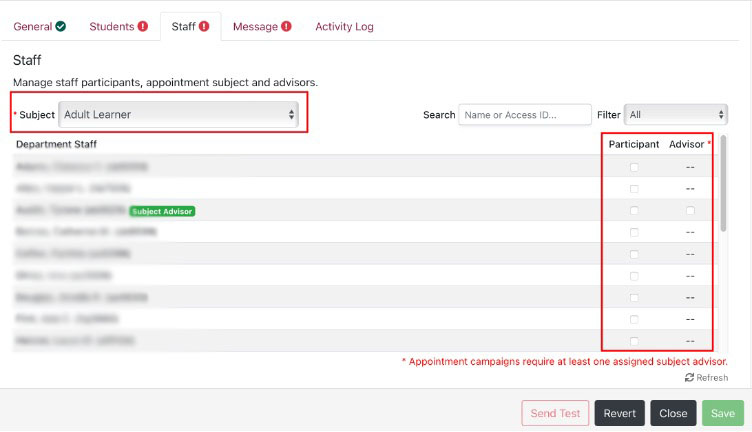
- Staff section
- Click the subject field to choose a subject for your campaign.
- Select advisors and staff members associated with the chosen subject.
- Optionally, include additional participants or non-advisory staff members.
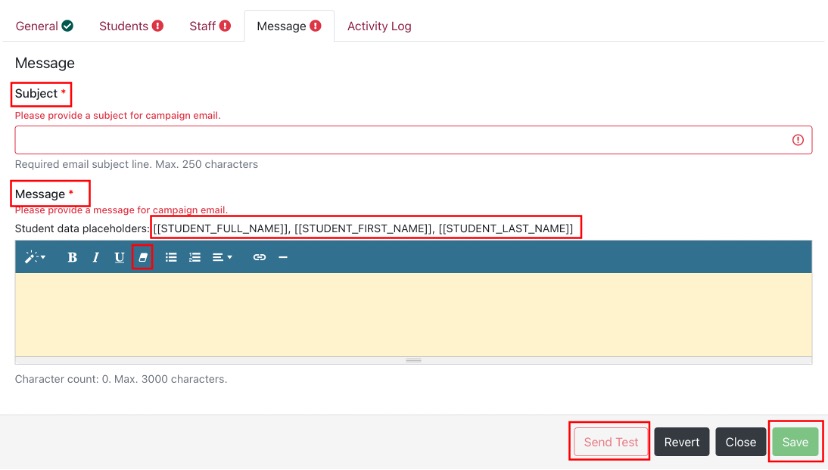
- Message section
- Fill in the subject line for your email.
- Use the text editor to compose your message.
- Note: Use placeholders to populate student names automatically.
- If pasting content, be cautious of white background issues and use the eraser tool to clear formatting.
- If you would like to preview the final message, click save and then click on the Send Test button.
- An email will be sent to your inbox for review.
- Once you have finalized the message, click Save to complete your campaign.
Managing campaigns
- Select a Campaign
- Navigate to the campaign section and select the campaign you want to manage.
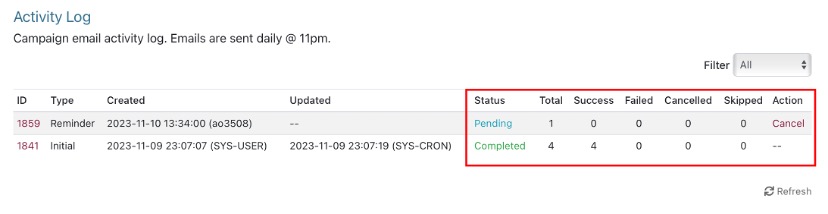
- View Activity Log
- Click on the Activity Log tab within the selected campaign. This is where you can review the original launch date of the campaign and all emails sent to students.
- Click on the Activity Log tab within the selected campaign. This is where you can review the original launch date of the campaign and all emails sent to students.
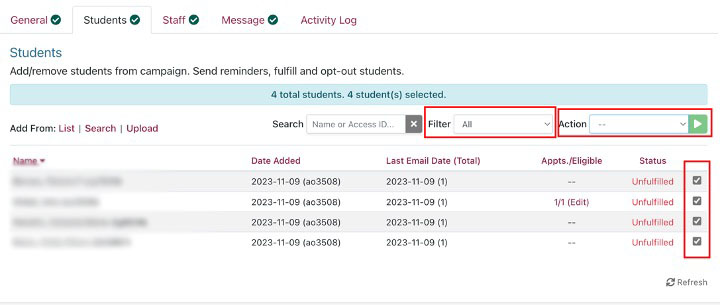
- Students tab
- The Students tab is where you manage and monitor your campaign. Here you can view all appointments scheduled by students or those scheduled outside the campaign.
- Use the Filter menu to categorize students based on fulfilled or unfilled appointments for the campaign.
- Use the Action drop-down menu to perform various campaign-related tasks:
- Sending reminders: Select students and send reminders for upcoming appointments.
- Removing students: Remove students from the campaign.
- Other campaign tasks: Explore additional options available in the drop-down menu for managing your campaign strategy.
Registration campaigns
Advisors can use registration campaigns to reach out to students who have yet to register for classes after the initial surge of registration. Students can click to register or opt-out from within the campaign messages.
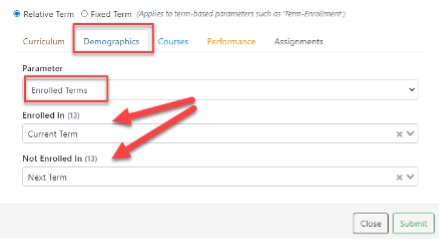
- Use the filters in the Advanced Search to run a list of students currently enrolled in classes but not yet registered for the upcoming term or graduation.

- Once the student population has been identified using the advisor, curriculum, watchlist or tag/cohort/attribute, add the No Pending Grad App filter from the Demographics - Categories list as well as the Enrolled in/Not Enrolled In filter in Demographics - Parameter - Enrolled Terms.
- Once you have the student list you want to use, create a watchlist to add to your campaign.
Graduation campaigns
Generally, studentseligible to apply for graduation will have close to 120 credits and at least a 2.0 cumulative GPA. Using the AdvancedSearch, add filters that will help identify these students. Like the registration campaign, students can click to apply or opt-out right from the message.
Tips
- Consider a broad credit-hour range to include students who may be bringing in transfer credits and/or have extra credits (min 90, max 140).
- For ease, use the Assignments tab, Advisor parameter to run the students assigned to you and/or other advisors (you can run multiple assignments). If you need to, use the curriculum parameters to specify the student population.

- Once you have the student list you want to use, create a Watchlist to add to your campaign.
More resources